Saturday, September 19, 2009

Shrimp and Avocado Salad (Cobb`s)


This is my and Rad`s favorite salad ever. Especially if it`s with Cobb`s dressing. This has daikon strings, some greens, onions, avocado, shrimps and tomatoes. Adding peas, garbanzos, tomatoes and other veggies will add to the tastiness of this salad. The picture below is another version with a bit of chicken, lettuce, nachos and boiled eggs. Unfortunately though, I haven`t tried my hand at homemade Cobb`s dressing.

Sunday, September 13, 2009

Inabraw or Dinengdeng


We called home today and they told us they were having frogs for lunch. A local delicacy. Since I have no way of getting hold of the same today, I decided to cook something close (not to frogs but to home, that is.). What`s more traditional Ilocano cooking than INABRAW? So timely because yesterday I spotted a lot of jute at the supermarket. If only there were malunggay but I guess I have to be thankful that at least familiar veggies were there.

Inabraw is also called dinengdeng and it usually contains a mixture of veggies in a bagoong (salted/fermented bonnet mouth fish or the shiokara 塩辛) soup base. It is different from pinakbet in that, inabraw is more soupy, less veggies and usually do not have tomatoes. Ilocanoes are voracious vegetable eaters and most of the combinations of vegetables in inabraw are those that can be found in one`s backyard. Perhaps this is one reason why Ilocanos are thought to be thrifty to the point of stinginess because most never have to go to the market to buy food because they can have a proper meal with just the leaves and fruits from their backyards.

Most common combination is malunggay (or leaves from the horseradish tree or Moringa oleifera) and jute or saluyot (moloheya or Corchorus sp.). I sometimes think that an Inabraw with only malunggay and jute in bagoong is the basic Inabraw. Some say one is not an Ilocano if they don`t have at least one horseradish tree in their yard. Jute on the other hand, grows just about anywhere and during rainy season, they just come out.

Cooking inabraw consists only of boiling water then adding the bagoong and then the veggies. Here are tips though that my parents especially my father taught us to make sure that the inabraw will come out appetizing and delicious. Other people may have different ways of preparing but this one works for me and my family.

1. Do not put too much water or else it will come out too soupy or what he terms as bumiraw biraw. It is not so appetizing to see all the veggies drowning in the soup base plus the excess water will dilute the taste from the veggies.

2. Put minimal bagoong. Although it is in a bagoong soup base, putting too much of bagoong will make it too salty. For a recipe for a family of 6, we usually just use about 1 tablespoon or lesser.

4. Put veggies which are hard to cook, first, and the leaves last. For example, in the above inabraw, I put the bitter gourd, then the eggplant and the jute leaves last. (by the way, the combination of the bitter gourd and jute is good because the sweetness from the jute contrasted with the bitterness of the gourd and the result is really so good!).

3. Never overcook the veggies. My father always stressed on maintaining the color of the veggies especially the green leafy ones. So, do not wait for the veggies to cook before you put in the next one. It is all about timing.

4. Boil a bit of ginger in the water before putting the bagoong. My mom taught me this. It adds flavor.

5. Add fried fish or pork or leftover pork adobo into the soup to have a little meaty taste.

6. If you do it right, you will never have the need to add msg or additional salt.

Now the only thing that I have to figure is how to cook inabraw without ever using bagoong. Rad wants it that way, but then it won`t be inabraw anymore. A bit of warning though, eating inabraw is an acquired thing. Oh well, mangantayon!

Thursday, September 10, 2009

Rosemary Chicken and Potatoes


I bought a marinated chicken (marinated in something a bit sweet and a bit spice with pepper)from the supermarket and usually I would just grill or fry it but I decided to spice things up a bit and coated it with the following mixture before baking it at 200℃ for an hour.

  • Rosemary mix ----Minced fresh rosemary, 2 tbsp lemon, 2 tbsp olive oil. (This is good for two big cuts already. I only cooked 1 tonight and froze the other.)

Halfway through the cooking time, I flipped the chicken. Then I realized it looks so lonely so I peeled and wedged some potatoes and cut some button mushrooms, sprinkled them with 1 tbsp olive oil(although the oil from the chicken would have been enough), pepper, minced garlic, a bit of garlic powder and some shichimi togarashi for a spicy taste, and just baked it along with the chicken for the last 30 minutes of cooking time. My did our kitchen smelled so nice! And that chicken was really good! Promise!

Tuesday, September 8, 2009

Finally! Muffins that look like Muffins!


I was on a roll last friday, Rad made me bake another batch of bagels and I made myself have another try at muffins without beating the batter! Here it is! Oh I was so happy when they finally came out looking like real muffins! I just used the basic muffin recipe and folded some blueberries, choco chips and pineapples. If you are thinking that I am too lazy to post the recipes, you are right. LOL! Just wanna share my excitement over my muffins. These were gone on our first day of our trip to Matsue (I`ll be blogging about it later). If you`ve got tips for a noob then please feel free to share! They are so welcome!

My Imperfect Bagels


Last Friday, Rad came back from work tired and so hungry and called to ask me if I`d like some bagels. We both love to sit and just savor the bagels at Bagel and Bagel. Since I just had my presentation and my adrenaline is still on a plateau, (although my head was already throbbing), I grabbed the opportunity to use the oven again and cook for him this time. Plus, I had to make something to bring with us in our trip the next day. So, I ventured into bagels. And I didn`t know that you had to boil them first before baking them! Making them was really fun! I was kneading them while Rad sat on a stool telling me about his day. I guess we got so engrossed in talking that I really kneaded the dough well enough because, I liked the consistency and elasticity that I came up with. Rolling and shaping it though was really tricky but practice makes perfect.

When it was cooked, I asked Rad how it tasted and he answered, "BAGEL!". It was enough.

Got this one from this hub. I followed the recipe except that I tried it only for half the measurements and still used 1 tablespoon of brown sugar, it was still good.

Homemade bagel recipe
4 cups bread flour
1 Tbls sugar
1 1/2 tsps salt
1 Tbls vegetable oil
2 tsps instant yeast
1-1/4- 1-1/2 cups of warm water

Mix all the ingredients in a bowl. You don't have to worry about soaking the yeast when you use instant yeast (most yeast sold these days is instant yeast). The dough should feel stiff, but add the extra water if it's really stiff, or you can't get all the dry flour incorporated.

Plop the dough down onto the counter, and knead for about ten minutes, or until the dough is uniform and smooth. Cut the dough into 8 equal sized balls, and let rest for 10-20 minutes.Pre heat your oven to 425F.

Now, take each of the dough balls and using two hands, roll it into a little snake on the counter. When the snake is longer than the width of your two hands, wrap it around your dominant roiling hand. The dough rope should be wrapped so the overlapping ends are together at your palm, near the start of your fingers. Now take the two overlapping ends, and use your palm to squish/roll these two ends together. Once the dough is fused, you should have a perfectly circular bagel-to-be! This is the only part of the process that can take a little practice before your bagels will look really professional. Don't get discouraged if they don't look perfect, it just takes practice!

Let your bagels rest on the counter for about 20 minutes, and meanwhile, bring a pot of water to boil, and grease a large baking tray lightly. You can just rub a splash of vegetable oil and rub it around. After the 20 minute wait, your bagels will start to look puffy, and it's time to get them boiling! Add them as many at a time as you can to your boiling water without crowding them. Boil for about a minute, turn them over, and boil for another minute. Take them out a let dry for a minute and then place them on your oiled baking tray. Repeat until all the bagels are boiled. Add the tray to the oven, and after 10 minutes, flip the bagels over, bake for another ten minutes; and they're done! Let them cool for at least 20 minutes, get the cream cheese ready, and feast on what's got to be one of the best weekend brunch treats possible!

You can add any toppings you like to these. To make sesame, onions, poppy seed, caraway etc. etc. bagels just have a dry plate ready with the seed or spice topping spread out on it. After the bagels have come out of the boiling water, place them face down onto the seeds, and then place the seed side up onto the baking tray. Bake and flip as for plain bagels.


Rad is Cooking.... again...


After more than two weeks of no post here, I am back with one of Rad`s cooking again. The past two weeks have been so busy for me that I asked Rad to excuse me from the household chores which included cooking, well mostly cooking because the clothes still needed to be laundered and no way will he ever try to decipher the kanjis on the washing machine. So the past two weeks consisted of eating out, bentos, and Rad`s occasional recipes. He`d always cook some porkchops for me whenever I have an exam or presentation but on the night before my presentation, we were not able to go to the supermarket so he had to make do with whatever was left in the fridge. There was chicke, sausage and some veggies and here is what he came up with. He claims it`s his teriyaki although he didn`t cook it the usual teriyaki way, and it didn`t even tasted like one. He just liked the sound of it, So, I`ll just call it Rad`s Chicken. One thing though, it was very delicious! He cooked enough for my lunch the following day because he had to go to work. I will have to post the recipe later as my cook is so fast asleep (poor thing, these castle trips are energy consuming!).

Tuesday, August 25, 2009

Never Beat a Muffin Batter


So sue me. I am new at this and mistakes are bound to happen. I was happy that I have muffin plates already so I tried them with the delicious banana-blueberry muffin recipe (and because of my excitement, I even put in choco chips! what the heck..). And since I have been making these quickbread recipes which I figured could also be turned into muffin delights so I thought, I had it all figured out. Well, I thought wrong. When the "muffins" came out of the oven, I thought they looked flat and a bit soft. Perhaps, I didn`t beat the batter well enough? No! I overdid it! Geez. Every muffin recipe should have the warning: "Never Beat the Batter!" for noobs like me.

Oh well, although they didn`t rise, they are still as good as I thought them to be. And Rad, bless his heart, said he loved them! (I even asked him to beat the mixture haha!). There is always next time.

Monday, August 24, 2009

Lavender`s Birthday and Sasami Cheese Katsu (Chicken Cutlets)


Our friend from India, Lavender, celebrated her birthday last Tuesday, August 18, but since we meet every Wednesday for Bible study, we decided to have dinner together at our apartment. She promised us the goodness of her Indian curry. I asked Rebecca over at
Chow and Chatter for some tips on what`s best to pair the curry with because her mother-in-law is visiting from India. She had an interesting suggestion but I promised to try it some other time as I didn`t have time to prepare it. So instead, I went the Japanese way (or Indian way) and made some katsu (like tonkatsu) to go with Lav`s egg curry. The recipe for egg curry would have to be posted later as soon as Lav takes a short break from her protein and cloning experiments.


This type of katsu is what I always order for lunch at the university cafeteria. Sasami Cheese Katsu or Chicken Fillet Cutlets. As in my post for Cheese Tonkatsu or Pork Cutlets, the procedure is the same. The only difference is, I used Chicken Fillet. Served with shredded fresh cabbage, and good company, again, more rice!


Oh and Lav`s cake was my very first attempt at making a birthday cake! It was a blueberry jam cake with Fresh Cream with blueberry yoghurt frosting. More birthdays to come Lav! Mangantayon!


Country White Bread


A while back, I posted here that I have found my bread recipe, that is, whole wheat honey bread recipe. However, it seemed that it is "too healthy" for Rad to enjoy. Thus, yet again, I found myself trying another recipe. So I went back to cookingbread.com and tried their recipe for country white bread. I was not disappointed. And what`s more, Rad liked it! The recipe is good for two 5x9 loaf bread but as I only have the smaller loaf pan, I was able to make 4 small loaves out of the dough. (I froze half of it for use later). This is good because there are only 2 mouths to feed here and 1 small loaf is gone in just one sitting so, that`s about 4 meals or 6 snacks. And like I said, although buying bread is, time-wise, the easiest and most practical way, nothing beats the satisfaction of baking your own bread. My bread turned out better this time because, I had Rad to knead it till it was smooth and elastic (I don`t have the strength or the patience LOL). It is indeed a "fairly heavy bread" with "a wonderful creamy color and soft texture". I followed the instructions to the dot so if you want to try it yourself, visit the site`s illustrated procedure here. Mangantayon!

Tuesday, August 18, 2009

Sinuglaw with Tako (He cooked! ...and blogged!)


Today, I came back late from school and so did Rad , from work. He assured me though that I won`t have to cook tonight because he will cook something that I would like to feature here in my blog. His "Sinuglaw". Even if dinner was late, it was worth it because once again, I ate my heart out. So here is Sinuglaw, a popular dish from Davao, whose name apparently came from the fusion of "sinugba" meaning grill and "hilaw" or "kinilaw" meaning raw. He even insisted on writing something plus the recipe! Well, well, well... an instant guest blogger!

He says:

Late this afternoon when I was about to board my train back to Shizuoka the thought of Mindanao, specifically Davao came to me. I was more of a beach bum way back then and no summer passes by that I don't stay at Samal island. I dunno, I may have had just a bad day, my mind was so dead tired, that I longed for the food of the island. Fresh sea foods. Specifically, the all time favourite kinilaw. So when I arrived at Shizuoka, took the bus home and got off at the supermarket to buy the ingredients. This time, my creative mind was awakened.

SINUGBA (INIHAW)--- Grill

Ingredients:
  • pork chops
  • kikkoman soy sauce
  • salt
  • a dash of black pepper

--- mix everything together then grill. It would be better if you can marinate the pork for a while before grilling. Then slice into bite sizes or in the same size as you would slice the tuna.


KINILAW (Raw)

Ingredients:
  • fresh tuna (maguro)
  • datu puti white vinegar (abt 3 tbsp)
  • a dash of salt
  • 1 lemon
  • 1/2 red bell pepper
  • 1/2 green bell pepper
  • 1/4 carrot
  • 1/2 onion
  • 1/2 ginger
  • *(all vegetables are cut into small bits)

1] While the pork is grilling, prepare the kinilaw or raw part. Slice tuna into cubes and mix with white vinegar add a dash of salt.
Toss until tuna meat is "cooked" (turns white).Discard the extra juice.

2] Toss tuna meat, ginger and onion with the lemon juice and put in the fridge or freezer till it is ready to serve. If you put it in the freezer, make sure that it won`t be too long for the mixture to freeze.

3] Slice/cut all other ingredients into small bits. You can either mix it together with or garnish afterwards for presentation.

-------- We both like fresh octopus or tako so I put some in too. When everything is cut and ready, mix the grilled and the raw parts together. Serve immediately.
And I say,

Oh how I wish this happens everyday... or at least every week!

note: I love how the colors and came out in the picture that I will enter this at Laura`s Best Food Foto at Hey What`s For Dinner Mom! .Drop by and check her wonderful blog. And don`t forget to drop by on Monday (or is that Sunday, Tokyo time?) and cast a vote! For my photos of course.LOL!

Monday, August 17, 2009

Peppered Beef


This is a repost from my other abandoned but soon to be refurbished blog at wordpress` Life is Beautiful.

It only involves frying the beef till they are brown, sauteiing with the garlic and the veggies and putting a tablespoon of soy sauce and sprinkling with lots of pepper!

I do most of the cooking here but when Rad and I get tired of the taste of my cooking, he volunteers to cook. I don’t complain coz when he cooks, I really eat and I mean EAT! There is this fastfood chain we usually go to for lunch. We always order their pepper rice because it appeals to our spicy taste buds and well we are really getting our 500 yen worth hehehe. So, yesterday, Rad went to Mom’s (supermarket) and bought some beef cubes and he made his version of pepper rice only he calls it Peppered Beef and Mushroom. I must say, I would pay twice what I pay for my pepper rice for what he cooked last night! It was really good! It was literally peppered with pepper, spicy but the beef taste was there and so with the green peppers. It was so good, twas a pity there was no Coca-cola to go with it. We are trying to cut our calorie intake by cutting on the sweets and soda drinks but last night, we ate all the rice cooked for supposedly two meals,, good-bye diet! Mangantayon!


Saturday, August 15, 2009

Pinakbet --- Ilocano Style

Photobucket
The Pinakbet is from the Ilocano word "pinakebbet" meaning "to shrivel" or "shrunk". It is a popular dish from the northern part of the Philippines which has become as popular in other places as well and with their own version. This version is what my parents taught me.

You can use just about any vegetable in it but the the most commonly used are string beans, bitter gourd, eggplant, okra, winged bean, chili peppers, winged beans, alukon (
Aleanthus luzonicus), and malunggay fruits (seed and pulp). When we arrived from our trip, somebody left a bag full of veggies at our door. I was so happy to find chilli peppers, string beans and eggplants. String bean is not easy to find from these parts so I immediately told Rad to buy additional veggies to make pinakbet.

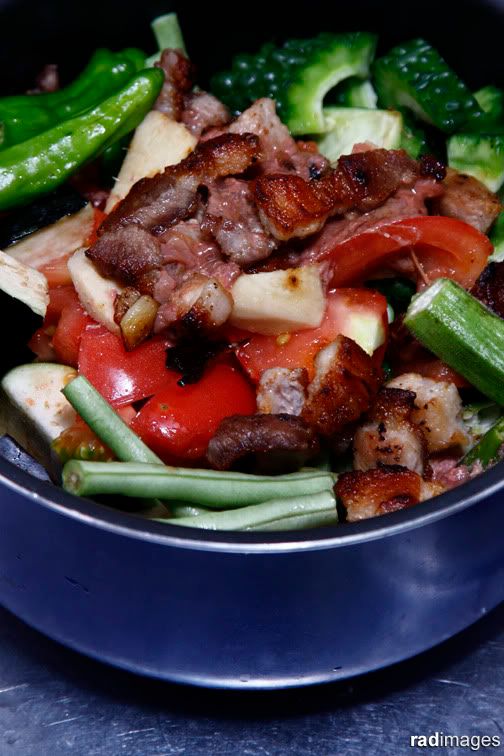
There are many versions on how to cook pinakbet. Some prefer to sautee the veggies but my parents said that the real pinakbet is to put it all together and to just let it simmer till the veggies shrink.

Ingredients:
string beans (about 8-10 strings) cut into 2-in length
1 eggplant, sliced
1/2 bitter gourd (I bought a big long one. We usually use the tiny round ones in Ilocos)
5 okra
5 chili peppers
2 big tomatoes, pulped, or cut
2 tsp bagoong (we have the shiokara (塩辛) here. it is milder than the normal Ilocano bagoong)
1/4 ginger, julliened or just cut


Directions:
Put all ingredients in a pot. You can dilute the bagoong in water but make sure that there won`t be too much liquid to simmer the mixture in. I always see to it that the total liquid won`t exceed half of the height of the mixed veggies. My mom always said to put a bit of salt in the tomatoes and mash and squeeze with your hands to get the juice out.
Cover and simmer for about 10 minutes or less. See if the veggies have been cooked enough. Add salt to taste. If you have to mix the veggies, mix them before cooking it. Don`t mix it while it is simmering, it will bring out the bitterness of the gourd. If you have to, then just toss it holding on to the handle of the pot. With the lid on of course.

I added some pork slices which I fried in its own fat beforehand. You can also put in fried fish or grilled fish or shrimps.And of course, the best would be to put in bits of
chicharon or bagnet.

I don`t use MSG in my cooking but some prefer to put a dash of it in.

In the Tagalog version of Pinakbet, slices of kalabasa or squash are added.

Note: The photo above is the uncooked version, with Rad`s watermark and not the usual "mangantayon" mark. Cook it then, mangantayon!

Friday, August 14, 2009

Whole Wheat Honey Bread


In the wake of the intensity 6.5 earthquake last Monday, Rad and I went shopping for some supplies. We have decided to again, revive our "earthquake" emergency bag. Funny how fear motivates one to finally get everything ready. Shizuoka City has been waiting for the Tokai earthquake for more than 30 years now and although, the city/prefecture prides itself as being ready for that great big quake, it pays to be ready, personally too. But this is not a blog about earthquake, so....

While we were shopping, I asked Rad to pick some bread for breakfast but he refused saying, "Why should we buy bread when now you can make it yourself already?". Needless to say, there`s that added pressure to have a newly baked bread available always. And so, despite my resolve to stay away from the oven for a while till I finish my papers, I once again, have to do some experiment.

I got this recipe from allrecipes.com .

Ingredients:

  • 2 cups warm water (about 45 degrees celsius)
  • 1 tbsp active dry yeast
  • 1/3 cup honey
  • 2 cups whole wheat flour
  • 1 tsp salt
  • 1/3 cup vegetable oil
  • 5 cups all-purpose flour

Directions:
Dissolve yeast in warm water. Add honey and stir well. Mix in whole wheat flour, salt, and vegetable oil. Work all-purpose flour gradually. Turn dough out onto a lightly floured surface, and knead for at least 10 - 15 minutes. When dough is smooth and elastic, place it in a well oiled bowl. Turn several times in the bowl to coat the surface of the dough and cover with damp cloth (I used a wrap). Let rise in a warm place until doubled in bulk, about 45 minutes.

Punch down the dough. Shape into two loaves, and place into two well greased loaf pans. Allow to rise until dough is 1 to 1 1/2 inches above pans.

Bake at preheated 190 degrees Celsius oven for 25-30 minutes.

I only used 1 1/2 cups of whole wheat flour so I adjusted the all-purpose flour. I also used 1 cup milk in lieu of one cup of water. I just liked the idea of having milk in my bread. I followed the directions to the letter except that, I left the dough to rise for about 4 hours because I had an appointment. When I came back, it really rose! and overflowed! Tehehehee

The recipe said that it can make two 9 x 5 in-loaf breads but I only had 2 small loaf pans I use for my quickbreads. So I used another round pan. The dough in the round pan, I mixed in raisins as per Rad`s request. I also put some lemon-sugar glaze because it looked so dry but even without the glaze, it would still taste great. It is a bit bland which is really good for bread to be used for sandwiches but I think adding honey up to 1/2 cup won`t hurt. I am quite thankful that I finally found a bread recipe which actually gave me the loaf bread that I wanted. It is quite an easy basic bread recipe with so many possibilities. This would surely become a weekly activity.

Friday, August 7, 2009

Sawasdee - Nagano City


It`s Seishun Juhachi Kippu season once again and Rad is on his seasonal Japanese castle quests. For this summer, he has Shinshu and Shikoku in his itinerary (this would mark his 60th or so castle). I was not supposed to go with him as I have really many things to do and deadlines to meet but when I looked at how much he would spend going alone compared to how much it would be if I tagged along, I packed my papers, my laptop and decided that I will just have to change my work environment. That was the best decision ever! I got rid of my household chores, slept in a nice bed for a change (we are using futon at home), and worked in a relatively cooler environment (Shizuoka is so deadly humid nowadays).

So, because I didn`t have my weekend posts, I decided to just share what we were up to for the up there in Nagano City. Well Rad did most of the travelling, burning himself in the process while I stayed at the hotel or at Starbucks burning holes in my brains but I can`t complain. He comes back tired and hungry so chances are we get to go to a nice diner for dinner. (By the way, you can read about the places he went to at his blog at Bushido Calling).

The first night, I packed us bento so we just ate in our room. On the second night however, Rad came back so exhausted and in need of a proper dinner so we decided to try the newly opened Asian restaurant called Sawasdee at the first floor of Smile Hotel (yup as in with the smiley).


It was quite dark inside, perhaps that`s the mood they wanted to give as we were led to our seats. They seated us to very nice chairs made of vines and each shaped like a cave. It was actually very comfortable that 2 slim persons can sit comfortably. Then they put a candle in our table and I had to ask for another one because, there is no way I would be able to see my food with just one candle and of course shooting would be near impossible in such low a light. It was however, so cozy and to some extent, romantic (had we been in the mood).


So anyway, we had Tom Yum Kun, Chicken in Thai sauce and basil, Thai seafood salad and jasmine rice. The Tom Yum Kun was as delicious as ever and their version had lots of vegetables in it. Thai chicken was a bit salty but it goes so well with the sweet dressing of the salad. Thai food has always been a favorite for us. Reminds us of our great Thai friends who are so good at making those so delicious Thai cuisines.


In our hunger and exhaustion, we didn`t even realize that we just had a candle lit dinner in a formal restaurant in our shorts! and later did we also realize that there is a special price for those beautiful seats as indicated in our receipt. Tehehehe it must have cost them a fortune to import those chairs from Thailand.


Sunday, August 2, 2009

Pan De Coco and Hot Cross Buns


I wanted to try making pan de coco for a long time now but I couldn`t decide on which dough recipe to use.
Kusina ni Manang suggested any sweet bread dough while CafeNilson recommended the challah dough, which, I can`t do because I don't have the book. It crossed my mind to just do my Honey Soft Dinner Buns but I wanted to try a new bread recipe so finally, I went back to CookingBread. com and settled on their Hot Cross Buns recipe.

Ingredients:

Dough:

  • 1 1/2 cups buttermilk (I used plain milk)
  • 1/4 cup melted butter (I used salad oil)
  • 2 eggs (beaten)
  • 1/2 cup brown sugar (I used 1/4 cup honey)
  • 3 1/2 - 4 cups bread flour
  • 1 tablespoon instant yeast
  • 1 teaspoon salt
  • 1/2 teaspoon nutmeg
  • 1 teaspoon cinnamon
  • 2 tbsp marmalade (for glaze)
Coconut Filling:
  • 3-4 tbsp brown sugar
  • 3 tablespoon dessicated coconut
  • water
Directions: (most of the following was copied and pasted from Cookingbread.com and edited according to what I really did.)

Heat milk to lukewarm, be sure to stir continually. Pour into a large bowl. Add in sugar, oil and eggs, mix with a wooden spoon. In a separate bowl add 1 cup of flour, cinnamon, nutmeg, salt and yeast. Stir with a wire whisk till well blended. Add dry ingredients to the liquid mixture. Stir with a wooden spoon till smooth. Add in another cup of flour and beat for 2 minutes. Continue to add flour slowly, till the dough comes together. Pour out onto a lightly floured surface and continue to knead for 8 minutes. You may not need all the flour. You want the dough to be on the sticky side rather then the dry side. The dough will become smooth and elastic. Add a little oil to a clean bowl add the dough. Cover with plastic wrap and let rise for about 2-3 hours. Punch down the dough. Allow the dough to rest for 20 minutes. Pour out the dough and shape into a log, cut dough in half. Cut each half into 6 pieces, for 12 pieces. Shape into balls and place onto the parchment paper . Cover with plastic wrap and allow to rise till double in size.

Mix the ingredients for the coconut filling and heat for a while until the the sugar has been dissolved and integrated with the coconut but not fully caramelized. Put the coconut filling and bake in preheated 180C oven for 30-35 minutes or until golden brown. Remove from oven and glaze with your favorite jam or marmalade. I did mine with orange marmalade.


Half of the dough, I made into the Hot Cross Buns.

Paste for the crosses:

  • 1 tablespoons flour
  • 1/4 teaspoon powder sugar
  • 1-2 tablespoons water
After buns have risen. Mix the ingredients for the paste to make the crosses. Place paste into a zip-lock bag and cut the tip off. Squeeze the paste on top of the buns to make the cross. Bake in a preheated 350 degree oven for bake 30-35 minutes or until golden brown. Remove from oven and heat apricot jam or marmalade in the microwave strain out the lumps and brush the tops of the buns.

The original recipe called for raisins and cranberries to be kneaded in the dough. I`ll reserve that for another time.

Banana Blueberry Oatmeal Bread


Rad liked the pineapple orange muffin bread so much that he asked for another batch. I think he liked the moistness of the cake. I decided not to go with the pineapple and orange but to do it with banana and blueberry as I had to get rid of the bananas anyway. Plus, I added some oats for a bit of chunky texture.
This is actually a muffin recipe but I used a square baking pan to cook it in.

Ingredients:
2 bananas, mashed
1 1/4 c. flour
1 cup quick cooking oats
1/4 c packed brown sugar
2 tbsp baking powder
1/2 t salt
2 eggs, slightly beaten
3/4 c. milk
3 tbsp melted butter or margarine (I used 3 tbsp salad oil)
almonds
blueberries

Directions:

In a large bowl, combine flour, sugar, baking powder and salt.
In another bowl, beat egg, add milk, melted butter, banana, blueberries and nuts. Boil oats and add to the mixture. Mix the liquid mixture into the dry mixture. Bake at 250C for 20 to 25 mins. Serve warm.


Well, Rad said it tasted like my banana cake only it is more moist and a fuller taste, perhaps because of the milk. Mangantayon!

Saturday, August 1, 2009

Bacon Asparagus with Pineapple


Still having last night`s dinner`s aftertaste, today`s breakfast is a combination of the Pizza and Pasta. Rad emphatically said "No" to eggs so we no longer see any eggs for meals. ( As long as he doesn`t see the eggs, like in cakes and bread, he is ok.) I was planned to do some bacon asparagus wrap but I was still sleepy and I still didn`t have the energy to do some wrapping and grilling. Thus, a simple and fast recipe on the skillet.

Ingredients:
  • 1 tbsp olive oil
  • minced garlic
  • 2-3 strips bacon
  • about 4 sticks of asparagus
  • pineapple chunks
  • 1 green bell pepper
  • pepper/salt

Directions:
Heat oil and put in minced garlic. As soon as you smell the garlic cooking, put the bacon and stir. Next, the asparagus and bell pepper and pineapple chunks. Sprinkle some pepper or salt to taste.

I didn`t have any plan of posting this here but he liked today`s breakfast so much so that he grabbed the camera as soon as I served it.

Pizza and Pasta Saturday


Rad went to Nagoya today for the Cosplay World Summit, not as a participant of course, but just to capture some cosplay portraits. My status on Facebook is that I am in a cooking frenzy. Frenzy meaning, I want to cook and cook and cook but I want em recipes to be very easy and fast tehehehe... So our dinner is, Pizza and Spaghetti! That`s how far my creative mind came up with.

I cheated on the pizza. I bought a frozen tomato-margarita cheese pizza yesterday and I just added 1 yellow and 1 green bell pepper, bacon, pineapples, more cheese and pepper.


The spaghetti is even easier. I didn`t want to make our usual katsuoboshi and spinach so I put it in with the spaghetti. Later on I found out that this is a very common simple spaghetti recipe. Well what do you know? tehehehe I can come up with a valid dish even without looking at the internet!

Spinach and Garlic Spaghetti

Ingredients:
  • 2-3 tablespoons Olive Oil
  • garlic, minced
  • pepper
  • parsley
  • spinach
  • spaghetti noodles

Directions:
Cook the noodles as directed in the package. Saute garlic in olive oil until fragrant smell but not burned or overbrowned. Sprinkle pepper and parsley. Put in spaghetti and spinach and mixed until the noodles are fully coated and the spinach is cooked. Add more parsley and/or pepper to taste.


Rad said he didn`t want spaghetti tonight but he wolfed everything anyway. Mangantayon!