Saturday, September 19, 2009

Shrimp and Avocado Salad (Cobb`s)


This is my and Rad`s favorite salad ever. Especially if it`s with Cobb`s dressing. This has daikon strings, some greens, onions, avocado, shrimps and tomatoes. Adding peas, garbanzos, tomatoes and other veggies will add to the tastiness of this salad. The picture below is another version with a bit of chicken, lettuce, nachos and boiled eggs. Unfortunately though, I haven`t tried my hand at homemade Cobb`s dressing.

Sunday, September 13, 2009

Inabraw or Dinengdeng


We called home today and they told us they were having frogs for lunch. A local delicacy. Since I have no way of getting hold of the same today, I decided to cook something close (not to frogs but to home, that is.). What`s more traditional Ilocano cooking than INABRAW? So timely because yesterday I spotted a lot of jute at the supermarket. If only there were malunggay but I guess I have to be thankful that at least familiar veggies were there.

Inabraw is also called dinengdeng and it usually contains a mixture of veggies in a bagoong (salted/fermented bonnet mouth fish or the shiokara 塩辛) soup base. It is different from pinakbet in that, inabraw is more soupy, less veggies and usually do not have tomatoes. Ilocanoes are voracious vegetable eaters and most of the combinations of vegetables in inabraw are those that can be found in one`s backyard. Perhaps this is one reason why Ilocanos are thought to be thrifty to the point of stinginess because most never have to go to the market to buy food because they can have a proper meal with just the leaves and fruits from their backyards.

Most common combination is malunggay (or leaves from the horseradish tree or Moringa oleifera) and jute or saluyot (moloheya or Corchorus sp.). I sometimes think that an Inabraw with only malunggay and jute in bagoong is the basic Inabraw. Some say one is not an Ilocano if they don`t have at least one horseradish tree in their yard. Jute on the other hand, grows just about anywhere and during rainy season, they just come out.

Cooking inabraw consists only of boiling water then adding the bagoong and then the veggies. Here are tips though that my parents especially my father taught us to make sure that the inabraw will come out appetizing and delicious. Other people may have different ways of preparing but this one works for me and my family.

1. Do not put too much water or else it will come out too soupy or what he terms as bumiraw biraw. It is not so appetizing to see all the veggies drowning in the soup base plus the excess water will dilute the taste from the veggies.

2. Put minimal bagoong. Although it is in a bagoong soup base, putting too much of bagoong will make it too salty. For a recipe for a family of 6, we usually just use about 1 tablespoon or lesser.

4. Put veggies which are hard to cook, first, and the leaves last. For example, in the above inabraw, I put the bitter gourd, then the eggplant and the jute leaves last. (by the way, the combination of the bitter gourd and jute is good because the sweetness from the jute contrasted with the bitterness of the gourd and the result is really so good!).

3. Never overcook the veggies. My father always stressed on maintaining the color of the veggies especially the green leafy ones. So, do not wait for the veggies to cook before you put in the next one. It is all about timing.

4. Boil a bit of ginger in the water before putting the bagoong. My mom taught me this. It adds flavor.

5. Add fried fish or pork or leftover pork adobo into the soup to have a little meaty taste.

6. If you do it right, you will never have the need to add msg or additional salt.

Now the only thing that I have to figure is how to cook inabraw without ever using bagoong. Rad wants it that way, but then it won`t be inabraw anymore. A bit of warning though, eating inabraw is an acquired thing. Oh well, mangantayon!

Thursday, September 10, 2009

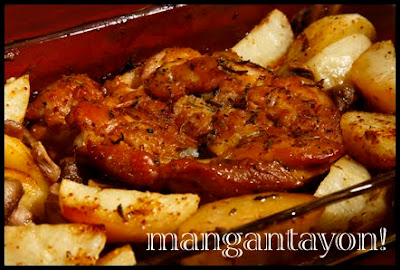
Rosemary Chicken and Potatoes


I bought a marinated chicken (marinated in something a bit sweet and a bit spice with pepper)from the supermarket and usually I would just grill or fry it but I decided to spice things up a bit and coated it with the following mixture before baking it at 200℃ for an hour.

  • Rosemary mix ----Minced fresh rosemary, 2 tbsp lemon, 2 tbsp olive oil. (This is good for two big cuts already. I only cooked 1 tonight and froze the other.)

Halfway through the cooking time, I flipped the chicken. Then I realized it looks so lonely so I peeled and wedged some potatoes and cut some button mushrooms, sprinkled them with 1 tbsp olive oil(although the oil from the chicken would have been enough), pepper, minced garlic, a bit of garlic powder and some shichimi togarashi for a spicy taste, and just baked it along with the chicken for the last 30 minutes of cooking time. My did our kitchen smelled so nice! And that chicken was really good! Promise!

Tuesday, September 8, 2009

Finally! Muffins that look like Muffins!


I was on a roll last friday, Rad made me bake another batch of bagels and I made myself have another try at muffins without beating the batter! Here it is! Oh I was so happy when they finally came out looking like real muffins! I just used the basic muffin recipe and folded some blueberries, choco chips and pineapples. If you are thinking that I am too lazy to post the recipes, you are right. LOL! Just wanna share my excitement over my muffins. These were gone on our first day of our trip to Matsue (I`ll be blogging about it later). If you`ve got tips for a noob then please feel free to share! They are so welcome!

My Imperfect Bagels


Last Friday, Rad came back from work tired and so hungry and called to ask me if I`d like some bagels. We both love to sit and just savor the bagels at Bagel and Bagel. Since I just had my presentation and my adrenaline is still on a plateau, (although my head was already throbbing), I grabbed the opportunity to use the oven again and cook for him this time. Plus, I had to make something to bring with us in our trip the next day. So, I ventured into bagels. And I didn`t know that you had to boil them first before baking them! Making them was really fun! I was kneading them while Rad sat on a stool telling me about his day. I guess we got so engrossed in talking that I really kneaded the dough well enough because, I liked the consistency and elasticity that I came up with. Rolling and shaping it though was really tricky but practice makes perfect.

When it was cooked, I asked Rad how it tasted and he answered, "BAGEL!". It was enough.

Got this one from this hub. I followed the recipe except that I tried it only for half the measurements and still used 1 tablespoon of brown sugar, it was still good.

Homemade bagel recipe
4 cups bread flour
1 Tbls sugar
1 1/2 tsps salt
1 Tbls vegetable oil
2 tsps instant yeast
1-1/4- 1-1/2 cups of warm water

Mix all the ingredients in a bowl. You don't have to worry about soaking the yeast when you use instant yeast (most yeast sold these days is instant yeast). The dough should feel stiff, but add the extra water if it's really stiff, or you can't get all the dry flour incorporated.

Plop the dough down onto the counter, and knead for about ten minutes, or until the dough is uniform and smooth. Cut the dough into 8 equal sized balls, and let rest for 10-20 minutes.Pre heat your oven to 425F.

Now, take each of the dough balls and using two hands, roll it into a little snake on the counter. When the snake is longer than the width of your two hands, wrap it around your dominant roiling hand. The dough rope should be wrapped so the overlapping ends are together at your palm, near the start of your fingers. Now take the two overlapping ends, and use your palm to squish/roll these two ends together. Once the dough is fused, you should have a perfectly circular bagel-to-be! This is the only part of the process that can take a little practice before your bagels will look really professional. Don't get discouraged if they don't look perfect, it just takes practice!

Let your bagels rest on the counter for about 20 minutes, and meanwhile, bring a pot of water to boil, and grease a large baking tray lightly. You can just rub a splash of vegetable oil and rub it around. After the 20 minute wait, your bagels will start to look puffy, and it's time to get them boiling! Add them as many at a time as you can to your boiling water without crowding them. Boil for about a minute, turn them over, and boil for another minute. Take them out a let dry for a minute and then place them on your oiled baking tray. Repeat until all the bagels are boiled. Add the tray to the oven, and after 10 minutes, flip the bagels over, bake for another ten minutes; and they're done! Let them cool for at least 20 minutes, get the cream cheese ready, and feast on what's got to be one of the best weekend brunch treats possible!

You can add any toppings you like to these. To make sesame, onions, poppy seed, caraway etc. etc. bagels just have a dry plate ready with the seed or spice topping spread out on it. After the bagels have come out of the boiling water, place them face down onto the seeds, and then place the seed side up onto the baking tray. Bake and flip as for plain bagels.


Rad is Cooking.... again...


After more than two weeks of no post here, I am back with one of Rad`s cooking again. The past two weeks have been so busy for me that I asked Rad to excuse me from the household chores which included cooking, well mostly cooking because the clothes still needed to be laundered and no way will he ever try to decipher the kanjis on the washing machine. So the past two weeks consisted of eating out, bentos, and Rad`s occasional recipes. He`d always cook some porkchops for me whenever I have an exam or presentation but on the night before my presentation, we were not able to go to the supermarket so he had to make do with whatever was left in the fridge. There was chicke, sausage and some veggies and here is what he came up with. He claims it`s his teriyaki although he didn`t cook it the usual teriyaki way, and it didn`t even tasted like one. He just liked the sound of it, So, I`ll just call it Rad`s Chicken. One thing though, it was very delicious! He cooked enough for my lunch the following day because he had to go to work. I will have to post the recipe later as my cook is so fast asleep (poor thing, these castle trips are energy consuming!).